16-18 Minute Read
- Introduction: The New Pricing Manager
- What Is the Pricing Manager?
What You Can Do Now That You Couldn’t Before - What Changed, and What Didn’t
- Setting Up Your Products
- Building Your Price Points
When to Build a New Price Point - Assigning Locations to a Price Point
- Moving and Removing Locations
- Managing All Your Pricing in One Place
- Bulk Price Adjustments
Adjust Across All Products
Adjust One Product - Changing Pricing for One Location Without Publishing
- Your Safety Net: Lock, Publish, Reset
- How the Pricing Manager Fits Into Your CRS Workflow
A Tool You Will Always Come Back To - What to Expect on Launch Day
- Why This Is a One of a Kind Solution
What This Means for Your Business - Start Using the Pricing Manager
Click on any section of this table of contents to quickly navigate to that area of the blog post.
Introduction: The New Pricing Manager
On June 1st, 2026, Cool Running Software launched a new and improved way to manage pricing for products across your entire customer list. It’s called the Pricing Manager, and it replaces the old tier system with one screen where you control every product, every price, and every customer group in one place.
To understand why this is a big deal, it helps to know how pricing software in this industry has always worked. Broadly, it splits into two camps. Some platforms run on packages. Others, like us, ran on tiers. Both get the job done, but both come with the same trade-off.
The package approach means you build a price package, a fixed set of products at set prices, then assign locations to it. If you want to change what one location pays for a single product, you can’t just change it. You build a whole new package and reassign them. It’s rigid, and it gets messy fast once you have dozens of customer groups paying different prices.
We ran on tiers, which had its own version of the problem. Products were grouped into tiers, one through ten, and anything that didn’t fit got a manual override at the location level. Those overrides piled up over time until no one could see the full picture of what each customer was actually paying.
We decided those trade-offs weren’t good enough. So we built something different.
The Pricing Manager fixes both problems. Instead of rigid packages or abstract tier numbers, you work product by product and build named price points: Kroger Contract, Wholesale, Events & Catering, whatever matches your business. You assign locations to a price point, and you manage every price for that product on one screen. Need to raise prices? Select your groups, set the percentage, preview the result, and publish. Across every location, all at once.
If you’re already a CRS customer, here’s the most important thing to know before anything else. Every price your customers pay today is exactly what they’ll pay on launch day. What’s new is the way you manage those prices going forward. Your existing tiers and overrides carried over automatically, and we’ll show you exactly where they landed.
This guide covers all of it: where to find the Pricing Manager, how it’s organized, how to build and manage your price points, how to push bulk price changes in seconds, and what to expect now that it’s live.
Want a live walkthrough? We’re hosting two training sessions, June 4 and June 11, both at 2:00 PM ET. Same material both days, and we’ll send the recording to everyone who registers.
What Is The Pricing Manager?
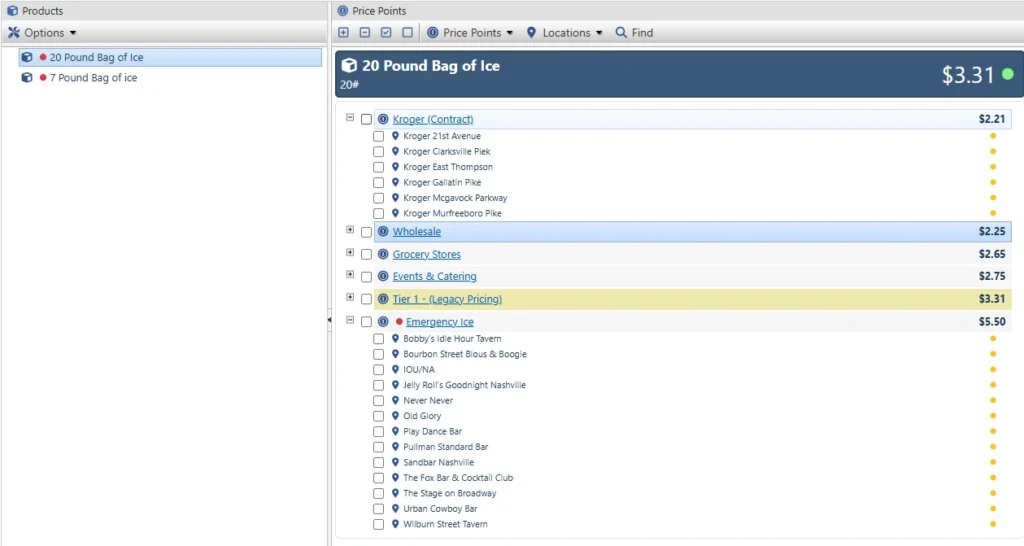
The Pricing Manager is a single screen inside Cool Running Software where you manage every product you sell, every price you charge, and every customer who pays it.
You’ll find it under Operations > Pricing Manager.
The whole tool runs on three simple layers:
- Products live on the left. Every product you sell, listed in one place.
- Price Points live on the right. These are your named pricing groups for whatever product you’ve selected, things like Kroger Contract, Wholesale, or Events & Catering.
- Locations live inside each price point. Every customer paying that price, grouped together.
That’s the entire mental model. Pick a product, see its price points, open a price point to see the locations paying it. Once that clicks, the whole tool makes sense.
Every product also has one default price. That’s what any location pays unless you’ve assigned them to a specific price point. Think of it as the fallback, so nothing is ever unpriced.
Before going further, watch the overview. This video walks through the entire tool from top to bottom in about ten minutes, and it’s the fastest way to see how everything connects.
What You Can Do Now That You Couldn't Before
A few of these are worth calling out up front, because they’re the reason this tool exists. We cover each one in full below.
- Bulk Price Adjustments. Push a percentage or dollar change across a whole group of customers, or your entire price book, in about thirty seconds. Preview it first, then publish. See it in action
- Named Price Points. Group customers under labels that mean something to your business, like Kroger Contract or Events & Catering, instead of tier numbers nobody remembers. How it works
- Move Locations In Seconds. A chain renegotiates, you select them and move them to a new price point. Done. How it works
- Preview Before Publish. See every change before it goes live. Nothing affects a customer until you hit publish. How it works
- A Reset Button. Change your mind mid-edit? Reset your unsaved changes and start over. No harm done. How it works
What Changed, And What Didn't
If you’re an existing CRS customer, this is the part to read closely. The short version: the way you manage pricing changed. What your customers pay did not.
What didn't change:
- Every price your customers pay today is exactly what they paid before launch. Nothing was repriced.
- Your existing tiers and overrides all carried over automatically. Nothing was lost.
- Adding new products works the same way it always has.
- You didn’t have to do anything. The migration happened for you.
What changed:
- Your old tiers and overrides now live in the Pricing Manager as named price points.
- Tier 1 is now called your default price.
- Pricing is managed from one screen instead of product by product, location by location.
- You now have tools you didn’t have before: bulk percentage changes, preview before publish, and a reset button if you change your mind.
That’s it. Same prices, better controls. If you want to see exactly where your old pricing landed in the new tool, jump to What To Expect On Launch Day. Otherwise, keep reading and we’ll walk through how to use it.
Setting Up Your Products
Good news first: this part didn’t change. If you’ve added a product in Cool Running Software before, you already know how to do it.
To add a product:
- Go to Operations > Products.
- Click Add New Product.
- Enter the product code and name.
- Set the default price.
- Click Create Product.
The tier system is gone. In its place, every product now has a single default price, which you set right here when you create the product. That’s the price a location pays when it isn’t assigned to a specific price point. Think of it as the baseline, so even a brand new product with no price points built yet is never unpriced.
If you were here for the old setup, the default price is where your Tier 1 pricing landed. Everything above that is now handled with named price points instead of tier numbers, which we’ll get into next.
Note on child products: If you’re adding child products, make sure your parent products are enabled first. You’ll find that setting under Admin > Settings > Products.
That’s the whole thing. Adding products works basically the way it always has, so let’s get to the part that’s actually new: building your price points.
Building Your Price Points
This is the heart of the Pricing Manager, and it’s the concept that replaces the old tier system.
A price point is a named pricing group for a single product. Instead of an abstract tier number, you create a group named for what it actually is: Wholesale, Events & Catering, Grocery Stores. You give it a price, you give it a name, and later you drop your locations into it.
To add a price point:
- Select a product on the left.
- In the Price Points panel, click Add.
- Enter the price.
- Enter a title for the price point.
- Save.
The new price point shows up in your list right away, but it’s pending until you publish. That’s by design, and it’s a safety feature we cover later. Nothing goes live until you say so.
Name it something you’ll recognize. The title is yours to customize however you want, so make it count. We recommend being descriptive, so when you come back to it weeks or months later you know exactly what it stands for and who’s in it. “Wholesale” or “Events & Catering” tells you everything at a glance. A vague label won’t.
You can build as many price points as a product needs. A 20 pound bag might have a Wholesale group, an Events & Catering group, and a Grocery Stores group all sitting side by side on one screen, each clearly named and priced.
When To Build A New Price Point
- For a sales channel. Wholesale, retail, grocery, convenience, each gets its own group at its own price.
- For a contract. A negotiated rate gets a name that matches the account, so anyone on your team knows exactly what it is.
- For a chain account. Group all the locations of one chain under a single named point.
- For a premium or seasonal rate. Events and catering, emergency ice, or peak-season pricing, all built as their own points.
Assigning Locations To A Price Point
A price point doesn’t do anything until you put customers in it. Assigning is how you connect your locations to the price they pay.
To assign locations:
- Click the price point you want to fill.
- Click Locations, then Assign.
- Browse your customer list and select the locations you want. Hold Control to grab several at once.
- Save.
That’s how you drop every wholesale account into your Wholesale group in one move, instead of pricing them one at a time.
There’s also a Find tool right in the same menu that searches across every customer and location. Type a name and it shows you what that customer has and what they’re paying, which makes it easy to track someone down before you assign or move them.
Moving And Removing Locations
As your business changes, customers move between groups. Moving and removing is how you keep everyone in the right price point without starting over.
To move locations between price points:
- Open the price point the locations are currently in.
- Check the locations you want to move.
- Click Locations, then Move.
- Choose the destination price point.
- Save.
This is what you reach for when a customer’s pricing changes, or when you want to split a group. Say you keep some stations at $2.00 and break the rest off into a new $2.50 point. Check the ones that are moving, send them over, done in seconds.
To remove locations:
- Open the price point.
- Check the locations you want to remove.
- Click Locations, then Remove Selected.
Removed locations fall back to the product’s default price until you assign them somewhere else.
Managing All Your Pricing In One Place
Once you’ve built your price points, you don’t have to open them one at a time to make changes. You can manage every price point for a product in a single view, where you rename, reprice, and clean things up all at once.
There are two ways to get there:
- Double-click any price point to open it and edit it directly, or
- Click Price Points, then Manage Prices to see and edit all of that product’s price points together.
To manage your price points:
- Select a product on the left.
- Open the price point you want, or click Price Points > Manage Prices to edit them all together.
- Edit the names and prices right in the list.
- Save.
This is where the one-screen idea really pays off. In one sitting you can rename a group to something clearer, bump one price point up, drop another down, and tidy up the whole product’s pricing without bouncing between screens. Make all your edits, then save them together.
Like every other change in the Pricing Manager, renames and reprices stay pending until you publish, so nothing affects a customer until you’re ready.
Deleting a price point: Before you can delete a price point, you have to move all of its locations out first. A price point with customers still assigned to it can’t be deleted, which keeps you from accidentally leaving a group of customers with no price. Once it’s empty, double-click the price point, delete it, and confirm.
When To Use This
- A price increase across one product. Update several of that product’s groups in one pass instead of one at a time.
- Cleaning up names. Rename vague or migrated labels into something your team will actually recognize.
- Pruning old groups. Delete price points you no longer use, once you’ve moved their locations elsewhere.
- A quick review. See every price for a product side by side to spot anything that looks off.
Bulk Price Adjustments
Instead of editing prices one group at a time, you push a change across many price points at once, preview it, and publish only when you’re ready.
There are two ways to do it, depending on how wide you want the change to reach.
Option 1: Adjust Across All Products
Use the Bulk Price Adjustment tool in the top-left Tools menu when you want to make a change across your whole system. It pulls in every product and every price point, and you check exactly which ones the change applies to. Adjust everything at once, or pick and choose across different products and groups. This is the one you reach for on a fuel surcharge or an annual price review, where the increase touches most of your book.
Option 2: Adjust One Product
Use Price Adjustment on the right-hand Price Points side when you only want to touch a single product. It locks you into whatever product you have selected, so if you’re on the 20 Pound Bag of Ice, the adjustment applies only to that product’s price points and nothing else. This is the targeted version, for when one product needs a bump and the rest stay put.
Both work the same way once you’re in. Here’s the panel:
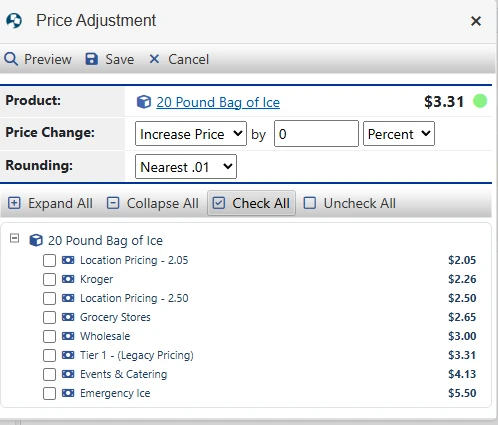
The Price Adjustment panel, locked to the 20 Pound Bag of Ice. Choose increase or decrease, set your percentage or dollar amount, pick your rounding, then check the price points you want it applied to.
How An Adjustment Works
Whether you’re adjusting all products or just one, you have the same controls:
- Increase or decrease. Raise prices or drop them.
- By percentage or by amount. Go up 5 percent across the board, or add a flat 50 cents, or a dollar, whatever you need.
- Rounding. Round the result to the nearest cent, nickel, or whatever keeps your prices clean.
- Check what it applies to. Use the checkboxes (and Check All / Uncheck All) to include or exclude specific price points. Anything unchecked stays exactly where it is.
Set your change, click Preview to see the new prices before anything is committed, and if it looks right, save. Like everything else in the Pricing Manager, the change stays pending until you publish, so you stay in full control right up to the last click.
When To Use Bulk Price Adjustments
- Fuel surcharge or cost increase. Push a percentage across your whole book in about thirty seconds.
- Annual price review. Raise everything a set amount, preview it, and exclude any group you want to hold steady.
- A single product bump. Use the one-product version to raise just your 20 pound bags without touching anything else.
- Seasonal adjustment. Bring a group up for peak season, then bring it back down after.
Changing Pricing For One Location Without Publishing
If you used overrides in the old system, this is where that workflow lives now, and it works better than it used to.
You can still set pricing for a single customer right from their record, without touching the Pricing Manager or publishing anything. The difference is that instead of typing in a one-off override price, you now assign each product to a price point. Same idea as before, cleaner result, because that location is tied to a named group you can see and manage later instead of a floating custom number.
To set pricing for one location:
- Go to Customers > Customer List.
- Search for the customer and select them from the list.
- Navigate to Products.
- Click Assign Products.
- Choose the product you want to add, then select the price point it should use from the dropdown.
- Save. The change applies to this one location right away.
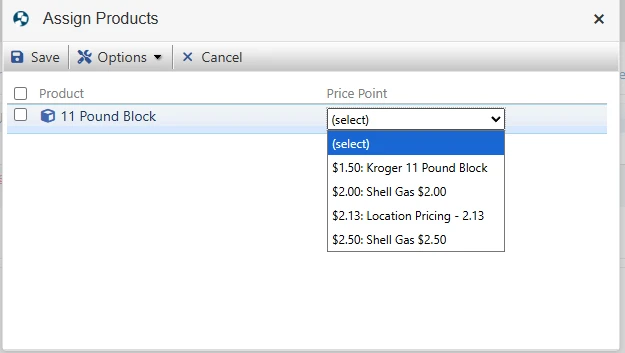
Assigning a product at the location level. For each product, you pick the price point it should use, so this customer is tied to a named group instead of a loose override.
The important part is what this protects. Say you’ve got next week’s price increase already staged in the Pricing Manager, a stack of changes sitting pending and not yet live. A new customer signs up today and needs pricing now. If you published from the Pricing Manager to set them up, your whole staged increase would go live early. This workflow avoids that. You price the new customer at their location, it takes effect immediately for them, and your pending Pricing Manager changes stay pending until you’re ready to publish them.
If you need a price point that doesn’t exist yet, you can create one on the fly here. It gets added to the Pricing Manager automatically, with just that location assigned to it, and it stays put when you finally publish your other changes.
When To Use This
- A new customer signs up mid-week. Price them today without disturbing changes you have staged for later.
- One-off contract pricing. Set a single account’s pricing without building it into your main structure.
- An emergency price change for one customer. Handle it right at their record, immediately.
- Testing a new group on one location before rolling it out across more customers.
Your Safety Net: Lock, Publish, Reset
Pricing is the one place you can’t afford a slip. Charge a customer the wrong amount and you’ve either lost money or lost trust. So the Pricing Manager is built with three guardrails that make sure nothing goes wrong, and nothing goes live, until you say so.
The Lock
Only one person can edit pricing at a time. When you enter editing mode, the Pricing Manager locks for everyone else, so two people can’t make conflicting changes at once and overwrite each other’s work. It’s a simple rule that prevents a whole category of expensive mistakes, especially in a busy office where more than one person has access.
Publish
This is the big one. Every change you make, a new price point, a rename, a location move, a bulk adjustment, sits pending until you click Publish. Nothing reaches a customer before that. Pending changes can stack up as long as you want, which means you can stage next month’s price increase today, leave it sitting, and it has zero effect on what customers pay right now. When you’re ready, one Publish commits everything at once, so you never end up with half-finished pricing live in the field. The one thing to remember: publishing is the point of no return. Once it’s live, it’s live.
Reset
Changed your mind before publishing? Reset undoes your pending changes and puts everything back the way it was. You can reset a single adjustment you’re working on, or use Reset Pricing in the Tools menu to scrap everything pending and start clean. As long as you haven’t published, you have a clear way back. That’s what lets you experiment freely, or hand the tool to a newer team member, without the fear of breaking anything.
Why This Matters
Most pricing software pushes your changes live the second you make them, with no preview and no undo. The Pricing Manager doesn’t work that way. Together, these three guardrails mean you can plan ahead, stage changes over days, recover from any mistake before it counts, and know that every price a customer sees is one you deliberately put there. Nothing accidental ever reaches them.
How The Pricing Manager Fits Into Your CRS Workflow
The Pricing Manager isn’t a separate tool you bolt on. It sits at the center of how pricing moves through Cool Running Software, from the moment you set a price to the moment it shows up on an invoice. Here’s how it all connects.
Step 1: Set Your Products And Default Prices
It starts in Operations > Products. Every product you sell gets a default price, the baseline anyone pays when they aren’t in a specific group. New products appear in the Pricing Manager automatically, ready to build around.
Step 2: Build Your Price Points
Inside the Pricing Manager, create named price points for each product: Wholesale, Events & Catering, Grocery Stores, whatever matches how you actually price. This is your pricing structure, laid out on one screen.
Step 3: Assign Your Locations
Drop your customers into the price points they belong to. Each location pays the price of its group, and anyone not assigned falls back to the default price. Now every customer is tied to a price you can see and manage.
Step 4: Stage Your Changes
When prices need to move, make your edits, run a bulk adjustment, rename or reprice a group, and let them sit pending. Nothing is live yet. You can stage as much as you want, over as many days as you want.
Step 5: Publish
When everything looks right, hit Publish. All your pending changes commit at once, and the new prices become live for the assigned locations.
Step 6: Your Prices Flow Through The Rest Of CRS
Once published, your pricing carries through everything downstream. Orders pull the right prices, the CR Driver App reflects them in the field, invoices bill the correct amounts, and your reporting stays accurate. Set it once in the Pricing Manager, and the rest of the system runs on it.
A Tool You Will Always Come Back To
Setup is just the start. The Pricing Manager is built to be the place you manage pricing on an ongoing basis, not a one-time configuration.
- Audit your prices any time. One screen shows every price for every product and group, which makes it easy to review what you’re charging, catch anything that’s drifted, and spot opportunities, especially in the off-season when you finally have time to look.
- Make changes whenever you need to. A cost increase, a renegotiated account, a seasonal shift, all of it happens in the same place with the same preview-and-publish safety, no matter the time of year.
- Onboard new products cleanly. Every new product you add to your business lands in the Pricing Manager automatically, so building out its pricing is part of the same familiar flow instead of a separate chore.
What To Expect On Launch Day
If you’ve been a CRS customer, this is the section that answers the only question that really matters: what happened to my pricing? The short answer is nothing changed for your customers, and you didn’t have to lift a finger. Here’s how your old setup carried over.
When the Pricing Manager went live, your existing pricing was migrated automatically. Every tier and every override you had was rebuilt inside the new tool, mapped to match what each customer was already paying. Nothing was repriced, and nothing was lost.
Here's how your old pricing carried over:
- Your Tier 1 prices became your default price. For each product, the old Tier 1 is now simply the default price any unassigned location pays.
- Your other tiers became named price points. The pricing from your old tiers was rebuilt as price points, labeled so you can tell which group is which.
- Your overrides became individual price points. Each location-level override became its own price point, with that location assigned to it.
- Every customer stayed on the price they were already paying. Each location was mapped to the price point that matches its old pricing, so nobody’s price moved.
So when you open the Pricing Manager and look at the names in your list, you’ll see groups labeled clearly, things like “Tier 1 (Legacy Pricing)” or a “Location Pricing” group at a specific price. Those are your old tiers and overrides, carried over and labeled so you always know exactly what each one is and where it came from. None of it is a leftover or an error. And you can rename any of it whenever you like to something that fits your business better.
One thing that did change: the old tier and override functions in the location and product areas have been removed, so everything now lives in one place. Going forward, the Pricing Manager is where all of this happens.
That’s the whole migration. Same prices, clearly organized, ready for you to manage in a way you couldn’t before. Watch the walkthrough below to see exactly how your pricing appears in the new tool.
Why This Is A One Of A Kind Solution
Most software makes you choose between rigid packages and abstract tier numbers, pushes your changes live the second you make them, and was never built for how an ice business actually prices. The Pricing Manager was built from the ground up to fix all of that. A few things set it apart:
- Named price points, not tier numbers. Your pricing is organized the way your business actually works, with groups labeled Wholesale or Events & Catering, not Tier 2 or Tier 7. Anyone on your team can look at it and know exactly what they’re seeing.
- Preview before publish. See every change before it touches a customer. Nothing goes live until you say so, which is something most pricing tools simply don’t offer.
- A real safety system. The lock, publish, and reset guardrails mean you can plan ahead, stage changes over days, and recover from any mistake before it counts.Pricing software shouldn’t let one wrong click cost you money. This one doesn’t.
- Built specifically for the ice industry. This isn’t a generic tool adapted to ice. It was designed for ice companies, around the real ways you price, by people who build only for this industry.
That combination doesn’t exist anywhere else, and it’s why CRS is the most innovative platform in the ice business.
What This Means For Your Business
All of that adds up to real, day-to-day wins:
- Hours saved on every price change. What used to take an afternoon of clicking now takes about thirty seconds. Push a change across your whole book, preview it, publish, done.
- Full oversight on one screen. Every product, every price, every customer group, in one view. No more wondering what a given customer is actually paying, or hunting through overrides to find out.
- Accurate pricing across every channel. Wholesale, grocery, events, contracts, each priced correctly and consistently, with the right amount flowing straight through to your invoices.
- The confidence to experiment without risk. Stage changes, try a new structure, hand the tool to a newer team member. As long as you haven’t published, there’s always a way back.
Start Using The Pricing Manager
The Pricing Manager is live in Cool Running Software, and every resource you need to learn it is available right now.
Watch the Live Training Recordings
We hosted two live training sessions with customers, walking through the tool in real-world scenarios and taking real questions throughout. Both are now available to watch anytime.
Live Training Session #1 (43 minutes)
The original walkthrough with Tony Dickson and Nick Hayes, including customer Q&A.
Live Training Session #2 (22 minutes)
A condensed walkthrough refined from Session #1. Same coverage, tighter pace,
A condensed walkthrough refined from Session #1. Same coverage, tighter pace,
Prefer to learn at your own pace?
Every step in this guide has a video. Watch the full series any time to walk through the tool feature by feature.
Still have questions?
Reach out any time. We’re here to help you get the most out of the Pricing Manager.
Contact us directly at iceguy@coolrunningsoftware.com or 440-343-1744
New To Cool Running Software?
The Pricing Manager is just one piece of a platform built entirely for ice companies. From scheduling and routing to dispatch, delivery tracking, online ordering, and invoicing, CRS gives you one connected system to run your whole operation. See how it all fits together.